A Linux bridge is a kernel module that behaves like a network switch, forwarding packets between interfaces that are connected to it. It's usually used for forwarding packets on routers, on gateways, or between VMs and network namespaces on a host.
The Linux bridge has included basic support for the Spanning Tree Protocol (STP), multicast, and Netfilter since the 2.4 and 2.6 kernel series. Features that have been added in more recent releases include:
- Configuration via Netlink
- VLAN filter
- VxLAN tunnel mapping
- Internet Group Management Protocol version 3 (IGMPv3) and Multicast Listener Discovery version 2 (MLDv2)
- Switchdev
In this article, you'll get an introduction to these features and some useful commands to enable and control them. You'll also briefly examine Open vSwitch as an alternative to Linux bridging.
Basic bridge commands
All the commands used in this article are part of the iproute2 module, which invokes Netlink messages to configure the bridge. There are two iproute2 commands for setting and configuring bridges: ip link and bridge.
ip link can add and remove bridges and set their options. bridge displays and manipulates bridges on final distribution boards (FDBs), main distribution boards (MDBs), and virtual local area networks (VLANs).
The listings that follow demonstrate some basic uses for the two commands. Both require administrator privileges, and therefore the listings are shown with the # root prompt instead of a regular user prompt.
Show help information about the
bridgeobject:# ip link help bridge # bridge -hCreate a bridge named
br0:# ip link add br0 type bridgeShow bridge details:
# ip -d link show br0Show bridge details in a pretty JSON format (which is a good way to get bridge key-value pairs):
# ip -j -p -d link show br0Add interfaces to a bridge:
# ip link set veth0 master br0

# ip link set tap0 master br0
Spanning Tree Protocol
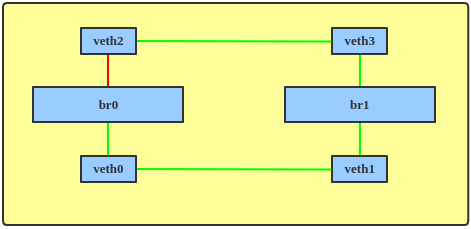
The purpose of STP is to prevent a networking loop, which can lead to a traffic storm in the network. Figure 1 shows such a loop.

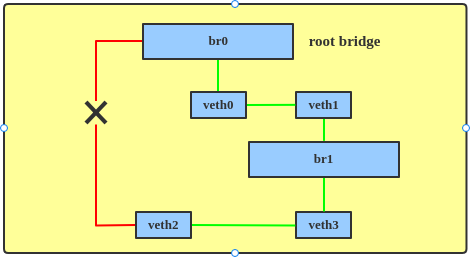
With STP enabled, the bridges will send each other Bridge Protocol Data Units (BPDUs) so they can elect a root bridge and block an interface, making the network topology loop-free (Figure 2).
Linux bridging has supported STP since the 2.4 and 2.6 kernel series. To enable STP on a bridge, enter:
# ip link set br0 type bridge stp_state 1Note: The Linux bridge does not support the Rapid Spanning Tree Protocol (RSTP).
Now you can show the STP blocking state on the bridge:
# ip -j -p -d link show br0 | grep root_port

                "root_port": 1,

# ip -j -p -d link show br1 | grep root_port

                "root_port": 0,

# bridge link show

7: veth0@veth1: <BROADCAST,MULTICAST,UP,LOWER_UP> mtu 1500 master br0 state forwarding priority 32 cost 2

8: veth1@veth0: <BROADCAST,MULTICAST,UP,LOWER_UP> mtu 1500 master br1 state forwarding priority 32 cost 2

9: veth2@veth3: <BROADCAST,MULTICAST,UP,LOWER_UP> mtu 1500 master br0 state blocking priority 32 cost 2

10: veth3@veth2: <BROADCAST,MULTICAST,UP,LOWER_UP> mtu 1500 master br1 state forwarding priority 32 cost 2The line labeled 9 in the output shows that the veth2 interface is in a blocking state, as illustrated in Figure 3.
To change the STP hello time, enter:
# ip link set br0 type bridge hello_time 300

# ip -j -p -d link show br0 | grep \"hello_time\"

"hello_time": 300,You can use the same basic approach to change other STP parameters, such as maximum age, forward delay, ageing time, and so on.
VLAN filter
The VLAN filter was introduced in Linux kernel 3.8. Previously, to separate VLAN traffic on the bridge, the administrator needed to create multiple bridge/VLAN interfaces. As illustrated in Figure 4, three bridges—br0, br2, and br3—would be needed to support three VLANs to make sure that VLAN traffic went to the corresponding VLANs.

But with the VLAN filter, just one bridge device is enough to set all the VLAN configurations, as illustrated in Figure 5.

The following commands enable the VLAN filter and configure three VLANs:
# ip link set br0 type bridge vlan_filtering 1

# ip link set eth1 master br0

# ip link set eth1 up

# ip link set br0 up


# bridge vlan add dev veth1 vid 2

# bridge vlan add dev veth2 vid 2 pvid untagged

# bridge vlan add dev veth3 vid 3 pvid untagged master


# bridge vlan add dev eth1 vid 2-3


# bridge vlan show

port              vlan-id

eth1              1 PVID Egress Untagged

                  2

                  3

br0               1 PVID Egress Untagged

veth1             1 Egress Untagged

                  2

veth2             1 Egress Untagged

                  2 PVID Egress Untagged

veth3             1 Egress Untagged

3 PVID Egress UntaggedThen the following command enables a VLAN filter on the br0 bridge:
ip link set br0 type bridge vlan_filtering 1This next command makes the veth1 bridge port transmit only VLAN 2 data:
bridge vlan add dev veth1 vid 2The following command, similar to the previous one, makes the veth2 bridge port transmit VLAN 2 data. The pvid parameter causes untagged frames to be assigned to this VLAN at ingress (veth2 to bridge), and the untagged parameter causes the packet to be untagged on egress (bridge to veth2):
bridge vlan add dev veth2 vid 2 pvid untaggedThe next command carries out the same operation as the previous one, this time on veth3. The master parameter indicates that the link setting is configured on the software bridge. However, because master is a default option, this command has the same effect as the previous one:
bridge vlan add dev veth3 vid 3 pvid untagged masterThe following command enables VLAN 2 and VLAN 3 traffic on eth1:
bridge vlan add dev eth1 vid 2-3To show the VLAN traffic state, enable VLAN statistics (added in kernel 4.7) as follows:
ip link set br0 type bridge vlan_stats_enabled 1The previous command enables just global VLAN statistics on the bridge, and is not fine grained enough to show each VLAN's state. To enable per-VLAN statistics when there are no port VLANs in the bridge, you also need to enable vlan_stats_per_port (added in kernel 4.20). You can run:
ip link set br0 type bridge vlan_stats_per_port 1Then you can show per-VLAN statistics like so:
# bridge -s vlan show

port              vlan-id

br0               1 PVID Egress Untagged

                    RX: 248 bytes 3 packets

                    TX: 333 bytes 1 packets

eth1              1 PVID Egress Untagged

                    RX: 333 bytes 1 packets

                    TX: 248 bytes 3 packets

                  2

                    RX: 0 bytes 0 packets

                    TX: 56 bytes 1 packets

                  3

                    RX: 0 bytes 0 packets

                    TX: 224 bytes 7 packets

veth1             1 Egress Untagged

                    RX: 0 bytes 0 packets

                    TX: 581 bytes 4 packets

                  2 PVID Egress Untagged

                    RX: 6356 bytes 77 packets

                    TX: 6412 bytes 78 packets

veth2             1 Egress Untagged

                    RX: 0 bytes 0 packets

                    TX: 581 bytes 4 packets

                  2 PVID Egress Untagged

                    RX: 6412 bytes 78 packets

                    TX: 6356 bytes 77 packets

veth3             1 Egress Untagged

                    RX: 0 bytes 0 packets

                    TX: 581 bytes 4 packets

                  3 PVID Egress Untagged

                    RX: 224 bytes 7 packets

TX: 0 bytes 0 packetsVLAN tunnel mapping
VxLAN builds Layer 2 virtual networks on top of a Layer 3 underlay. A VxLAN tunnel endpoint (VTEP) originates and terminates VxLAN tunnels. VxLAN bridging is the function provided by VTEPs to terminate VxLAN tunnels and map the VxLAN network identifier (VNI) to the traditional end host's VLAN.
Previously, to achieve VLAN tunnel mapping, administrators needed to add local ports and VxLAN network devices (netdevs) into a VLAN filtering bridge. The local ports were configured as trunk ports carrying all VLANs. A VxLAN netdev for each VNI would then need to be added to the bridge. VLAN to VNI mapping was achieved by configuring a port VLAN identifier (pvid) for each VLAN as on the corresponding VxLAN netdev, as shown in Figure 6.
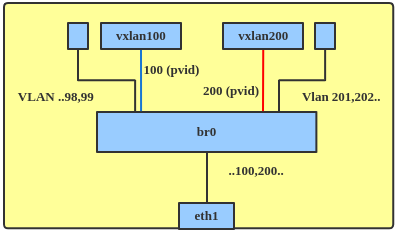
Since 4.11, the kernel has provided a native way to support VxLAN bridging. The topology for this looks like Figure 7. The vxlan0 endpoint in this figure was added with lightweight tunnel (LWT) support to handle multiple VNIs.
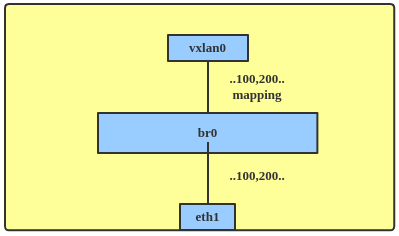
To create a tunnel, you must first add related VIDs to the interfaces:
bridge vlan add dev eth1 vid 100-101

bridge vlan add dev eth1 vid 200

bridge vlan add dev vxlan0 vid 100-101

bridge vlan add dev vxlan0 vid 200Now enable a VLAN tunnel mapping on a bridge port:
# ip link set dev vxlan0 type bridge_slave vlan_tunnel onAlternatively, you can enable the tunnel with this command:
# bridge link set dev vxlan0 vlan_tunnel onThen add VLAN tunnel mapping:
# bridge vlan add dev vxlan0 vid 2000 tunnel_info id 2000

# bridge vlan add dev vxlan0 vid 1000-1001 tunnel_info id 1000-1001


# bridge -j -p vlan tunnelshow

[ {

        "ifname": "vxlan0",

        "tunnels": [ {

                "vlan": 100,

                "vlanEnd": 101,

                "tunid": 100,

                "tunidEnd": 101

            },{

                "vlan": 200,

                "tunid": 200

            } ]

} ]Multicast
Linux bridging has included support for IGMPv2 and MLDv1 support since kernel version 2.6. IGMPv3/MLDv2 support was added in kernel 5.10.
To use multicast, enable bridge multicast snooping, querier, and statistics as follows:
# ip link set br0 type bridge mcast_snooping 1

# ip link set br0 type bridge mcast_querier 1

# ip link set br0 type bridge mcast_stats_enabled 1

# tcpdump -i br0 -nn -l

02:47:03.417331 IP 0.0.0.0 > 224.0.0.1: igmp query v2

02:47:03.417340 IP6 fe80::3454:82ff:feb9:d7b4 > ff02::1: HBH ICMP6, multicast listener querymax resp delay: 10000 addr: ::, length 24By default, when snooping is enabled, the bridge uses IGMPv2/MLDv1. You can change the versions with these commands:
ip link set br0 type bridge mcast_igmp_version 3

ip link set br0 type bridge mcast_mld_version 2After a port joins a group, you can show the multicast database (mdb) like so:
# bridge mdb show

dev br0 port br0 grp ff02::fb temp

dev br0 port eth1 grp ff02::fb temp

dev br0 port eth2 grp ff02::fb temp

dev br0 port eth2 grp 224.1.1.1 temp

dev br0 port br0 grp ff02::6a temp

dev br0 port eth1 grp ff02::6a temp

dev br0 port eth2 grp ff02::6a temp

dev br0 port br0 grp ff02::1:ffe2:de9f temp

dev br0 port eth1 grp ff02::1:ffe2:de9f temp

dev br0 port eth2 grp ff02::1:ffe2:de9f tempBridging also supports multicast snooping and querier on a single VLAN. Set them as follows:
bridge vlan set vid 10 dev eth1 mcast_snooping 1 mcast_querier 1You can show bridge xstats (multicast RX/TX information) with this command:
# ip link xstats type bridge

br0

                    IGMP queries:

                      RX: v1 0 v2 1 v3 0

                      TX: v1 0 v2 131880 v3 0

                    IGMP reports:

                      RX: v1 0 v2 1 v3 0

                      TX: v1 0 v2 496 v3 18956

                    IGMP leaves: RX: 0 TX: 0

                    IGMP parse errors: 0

                    MLD queries:

                      RX: v1 1 v2 0

                      TX: v1 51327 v2 0

                    MLD reports:

                      RX: v1 66 v2 6

                      TX: v1 3264 v2 213794

                    MLD leaves: RX: 0 TX: 0

MLD parse errors: 0There are other multicast parameters you can configure, including mcast_router, mcast_query_interval, and mcast_hash_max.
Bridge switchdev
Linux bridging is always used when virtual machines (VMs) connect to physical networks, by using the virtio tap driver. You can also attach a Single Root I/O Virtualization (SR-IOV) virtual function (VF) in a VM guest to get better performance (Figure 8).

But the way Linux used to deal with SR-IOV embedded switches limited their expressiveness and flexibility. And the kernel model for controlling the SR-IOV eSwitch did not allow any forwarding unless it was based on MAC/VLAN.
To make VFs also support dynamic FDB (as in Figure 9) and maintain the benefits of the VLAN filter while still providing optimal performance, Linux bridging added switchdev support in kernel version 4.9. Switchdev allows the offloading of Layer 2 forwarding to a hardware switch such as Mellanox Spectrum devices, DSA-based switches, and MLX5 CX6 Dx cards.
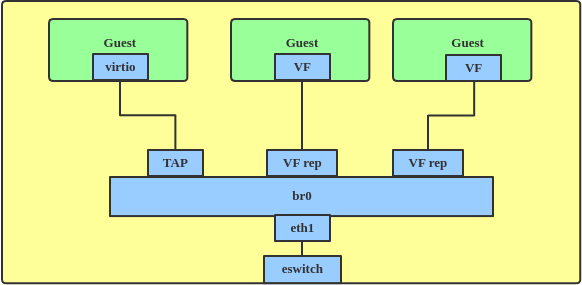
In switchdev mode, the bridge is up and its related configuration is enabled, e.g., MLX5_BRIDGE for an MLX5 SRIOV eSwitch. Once in switchdev mode, you can connect the VF's representors to the bridge, and frames that are supposed to be transmitted by the bridge are transmitted by hardware only. Their routing will be done in the switch at the network interface controller (NIC).
Once a frame passes through the VF to its representor, the bridge learns that the source MAC of the VF is behind a particular port. The bridge adds an entry with the MAC address and port to its FDB. Immediately afterward, the bridge sends a message to the mlx5 driver, and the driver adds a relevant rule or line to two tables located in the eSwitch on the NIC. Later, frames with the same destination MAC address that come from the VF don't go through the kernel; instead, they go directly through the NIC to the appropriate port.
Switchdev support for embedded switches in NICs is simple, but for full-featured switches such as Mellanox Spectrum, the offloading capabilities are much richer, with support for link aggregation group (LAG) hashing (team, bonding), tunneling (VxLAN, etc.), routing, and TC offloading. Routing and TC offloading are out of scope for bridging, but LAGs can be attached to the bridge as well as to VxLAN tunnels, with full support for offloading.
Bridging with Netfilter
By default, the traffic forwarded by the bridge does not go through an iptables firewall. To let the iptables forward rules filter Layer 2 traffic, enter:
ip link set br0 type bridge nf_call_iptables 1The same procedure works for ip6tables and arptables.
Bridge ageing time
Ageing determines the number of seconds a MAC address is kept in the FDB after a packet has been received from that address. After this time has passed, entries are cleaned up. To change the timer, enter:
ip link set br0 type bridge ageing_time 20000Bridging versus Open vSwitch
Linux bridging is very useful and has become popular over the past few years. It supplies Layer 2 forwarding, and connects VMs and networks with VLAN/multicast support. Bridging on Linux is stable, reliable, and easy to set up and configure.
On the other hand, Linux bridging also has some limitations. It's missing some types of tunnel support, for instance. If you want to get easier network management, more tunnel support (GRE, VXLAN, etc.), Layer 3 forwarding, and integration with software-defined networking (SDN), you can try Open vSwitch (OVS).
To learn more about Linux network interfaces and other networking topics, check out these articles from Red Hat Developer: